Lynn and Gary's Eagle Bus - Early Stages
Gary's lifelong dream was to do a bus-conversion on a classic Eagle Bus. We became RV'ers in the mid 80's. At that time we had a second craft gallery in Coconut Grove, Florida called American Details. We spent the winter months living in Florida but had a tough time finding a decent apartment that would accept dogs. Gary came up with the idea of getting an RV. At first I was horrified by the idea of living in an RV, but after we started looking at them it seemed like it might be fun. Over the years our RV's grew in size from our first small conversion van to a 45' 5th wheel with three slide-outs. We did lots of customizing to that last 5th wheel and this really inspired Gary to want to due a big scale bus-conversion. He did lots of research on the Internet about where to find the right bus and who to use to do the initial steps that he couldn't do. He eventually decided on I-44Bus Sales, Inc. a company that sells empty bus shells for people who want to do their own bus-conversions. Eagle buses are no longer being made, but are very desirable among "bus nuts" like Gary.


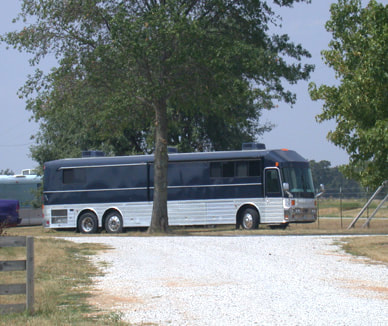
Our bus was built in 1990 and traveled daily from Mexico City to Los Angeles. It was retired in 2000.
I-44 Bus refurbished the bus to the point where Gary could take over. They raised the roof, put in a new engine, new exterior skin, 2 slide outs, new stainless steel bottom and paint job. Gary rented a wood shop in Bakersville, NC where we lived while working on the bus-conversion which took about 3 years. Gary still had responsibilities at Craft Company No. 6 but spent a great deal of time in NC. I was primarily in Rochester but came to NC whenever I could get away.
I-44 Bus refurbished the bus to the point where Gary could take over. They raised the roof, put in a new engine, new exterior skin, 2 slide outs, new stainless steel bottom and paint job. Gary rented a wood shop in Bakersville, NC where we lived while working on the bus-conversion which took about 3 years. Gary still had responsibilities at Craft Company No. 6 but spent a great deal of time in NC. I was primarily in Rochester but came to NC whenever I could get away.

Two slide-outs were installed in the bus.


|

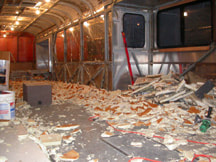
We loved the "WATCH YOUR STEP" sign in both English and Spanish and planned to work this into our finished design. The first steps in the bus-conversion were mostly tearing things out and working on things that didn't show like insulation, wiring and plumbing. After tearing out the insulation Gary painted the metal frame work with rust- proof paint. Then new insulation was put between the metal studs and the interior was covered with plywood.
The fist image below shows the large amount of old insulation that was removed. In the second image you will see the bus interior all clean and shiny. |

The first picture below shows the rear of the bus where our bedroom will be. A king size bed will be placed on top of the slide-out.


After installing new insulation between the metal studs it was time for wiring and plumbing that runs under the floor.
Rust-proof paint was applied to the metal frame.
Rust-proof paint was applied to the metal frame.


Gary covered the entire interior of the bus with plywood after wiring the ceiling for lighting and air-conditioning. The entire rear end of the bus was made into a large cedar lined closet. I made a bus-conversion floor plan in Photo Shop that we used as a guide for marking off the the actual space on the floor of the bus. We needed the plan to work well while the slide-outs are in as well as out. Remember that we will be using the bus with slide-outs in while driving and also if we park in some small spots. The blue tape marks and foam cut-outs are how we laid out our floor plan and divided off "rooms."


Framing the rooms was the next step. The bathroom area consist vanity, laundry, closet, private commode and large walk in shower.
The kitchen area includes a sink in stainless steel countertop, stove with oven, microwave over the stove large double door refrigerator, cabinets and a pull-out pantry.
The kitchen area includes a sink in stainless steel countertop, stove with oven, microwave over the stove large double door refrigerator, cabinets and a pull-out pantry.


Gary took advantage of the good weather in Summer '05 to work on the bays under the floor of the bus. This is where the heater, waste storage tanks and that kind of stuff go. We will also have bays for storage and one will be an outdoor entertainment center.

The ceiling in the bus was a bit of a challenge because of the curves on the sides and the wiring and AC that needs to run down the center. We decided on American walnut for the interior paneling and light ash for floors.


As you can see we are making progress and now have the refrigerator installed and lots of the paneling done. There's even a chair for all the visitors who stop in to check on our progress. Marge and Buddy Ray, our dogs at the time, were very happy to see the chair arrive.
Tiling the bathroom area was where I got to contribute. I first did a design on the computer and then actually laid the tile. This was my first experience tiling and it was fun. Those little white plastic spacers really helped to keep the tiles straight and grout lines even.
Tiling the bathroom area was where I got to contribute. I first did a design on the computer and then actually laid the tile. This was my first experience tiling and it was fun. Those little white plastic spacers really helped to keep the tiles straight and grout lines even.


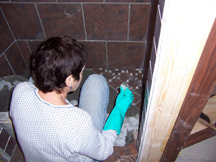


Next came tiling the top of the vanity. In the first picture below, Gary is cutting a hole for the hammered copper sink. The last picture shows the installed stacking washer and dryer.


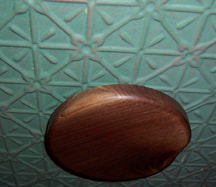
The ceiling over the living room, kitchen and bath areas is press tin with a patina finish. The round wood pieces are AC air diffusers.

We are now at the really fun part of the bus-conversion project; the furniture and finishing details. Sticks™ the furniture and object art line that we carried at Craft Company will be doing the doors for the back closet headboard for the bed, closet doors in the bathroom and some living room furniture.

|
Click the links to learn more . . . about us
BUS CONVERSION 1 BUS COMPLETED BUS-BARN CABIN BARN WOOD SHOP LAND Have a question or comment? Email: lynn@gonecountry.me That's our handsome Basset Hound Buddy Ray in the photo. Buddy Ray now resides at Rainbow Bridge. |
Site powered by Weebly. Managed by StartLogic